Showing posts with label Homebrew. Show all posts

Sunday, August 9, 2009

Rigs Pinout

Alinco kenwood yeasu icom others pinoutI stumbled upon this great site with pinout for most rigs. PTT pinout for Kenwood, Alinco, Icom and many more. Those interested for their rigs for APRS or other purpose can go to this site. I will also have a link in the sidebar.


Sample of pinout and descriptions.


Click image to visit site.


Image by and copyright of Roy Frettsome, G4WPW.
Image used with prior premission.

Wednesday, June 24, 2009

Protecting your PCB

A completely cleaned PCB.
This will teach you how to protect you PCB foil pattern from oxidation. I am using a unetched PCB for demonstration. You would be doing this AFTER you etched you PCB.


I used a cotton bud, you could get an appropriate brush to do the same. The trick is using clear varnish to the tracks BEFORE soldering. Here i am applying varnish to to top part of the PCB.


This is what it looks like after the varnish is applied. It takes about 2 to 4 hours for the varnish to completely dry. This depends on how concentrate your varnish is. You can mix thinner in your varnish to dilute it if it takes too long. Also i do not recommend a very thick coat.


This is what the PCB looks like after a few days. Oxidation set in. Notice the part of PCB varnished is not affected.


This is the best part. Varnish not only protects your PCB, it also acts as flux which you don't have to wash off.


Top view of the solder joint. It perfect. So it protects your PCB and functions as flux. You can solder while the varnish is not yet dry, but it tends to be sticky. So take care. Oh...if you don't want to get high while varnishing, use appropriate protection.


73.

Friday, December 5, 2008

Etch tank

Get a small fish aquarium to use as an etch tank. Big enough to place your biggest PCB into it. This one is 8"x5". Also get some air tubing and suckers to hold the tubing to the base of the tank. 0 Tank n Tubing
You can get a small air pump, as displayed, or get a bigger one...More power, more bubbles. :-) 1 Pump
Heat one end the the air tubing with an open flame and then seal it using pliers. 3 Seal one end
This is what is looks like after it is sealed. 4 Sealed
Using a fine sewing needle make holes in the tubing towards the sealed end. If holes are big, the bubbles will be big, I prefer many smaller holes and finer bubbles. Make holes the length of the tank. 5 Make Hole
Use the sucker the hold the tubing do the base of the tank. 6 Tubing n suckers
I made a cover from cardboard and made a hole for tubing to fit thru. the board was cut at the back about 2" and rejoined using masking tape.   8 Closed cover
The cover is more of a protection from the bubbles splashes escaping the tank and staining anything around it.  7 Tank n Cover
Use water to test the tubing, once satisfied the the bubbles, (size of bubbles and the length of tubing where the bubbles released), drain water and replace with Ferric Chloride. 9 Demo


The tank is use to speed up the etching process. I tape a length of string one the back of the PCB and let it float on the etching solution. You will know it is done when you can see the PCB design  Refer to my older post.

I stopped using the air stone as it does not last and disintegrates over time.  You can also purchase from fish shops air tube that produces fine bubbles. Where is the fun in homebrewing in doing that... :)

Monday, July 28, 2008

PSU 15V 22A


My very first project as an amateur radio operator was a power supply unit. It is transformer based. And i build this from the schematics from the net. Also i did not have knowledge of UV PCB back then, so it was build on a vero board.... Not recommended. I added a volt and ammeter not in the schematics. The volt meter is connected across the +ve and -ve DC output and the ammeter is thru the DC +ve output. Also i recommend a bigger or 3 or 4 22000uF capacitors in parallel and a 18V 22A transformer instead of 15V.

To those who want to built this here are the schematics or you can get newer designs from http://users.belgacom.net/hamradio/homebrew.htm.


Click to enlarge


This design is no longer available on that site. Below my finished product.


Sunday, June 29, 2008

Fox hunting! Yagi!

To find the fox you need to build a directional antenna. Yagi is usually used. Test the antenna after you build it, an make sure it is DIRECTIONAL. A friend of mine built, i think the world first omni-directional yagi.

Below links to some sites to help you build a yagi. Take care building it, measurement must be precise. If you are the adventurous kind, check the net to build an attenuator. This will help you find the fox more accurately.

Tape measure Yagi
http://home.att.net/~jleggio/projects/rdf/tape_bm.htm
http://www.open-circuit.co.uk/tape.php


Attenuator

http://home.att.net/~jleggio/projects/rdf/p_atten.htm
http://home.att.net/~jleggio/projects/rdf/a_atten.htm


Sign up quickly, only 20 days left...Happy hunting..73's.

Sunday, May 25, 2008

Soldering Lead Dispenser

Scrolling UPDATE

Download template here.


Went to a shop that frames pictures at Jalan TAR, and got this cardboard sheet from there. One sheet was for RM$16 for 8' x 4' size. Had it cut into 4' x 4' size as shown on the left.


Bought this brass rod long time ago to make an quarter wave antenna but never got around to doing it. The rod is 3mm thick and about 1 meter long.


I did a template of the dispenser in Gimp. Actually i am using a different template than the one shown. :)


.
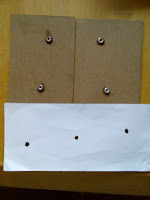
Using the template i cut the baord about 1cm larger than the template size. Cut two pieces one for each side one smaller piece for the base and one narrower piece for the back. You will understand everything soon enough.

If you make you own template, cater for the board thickness. If you can cut the board at 45 degrees angle that would be the best. My new template already caters for the board thickness so you don't have to cut 1cm extra


Get 6 nuts, the hole must be big enough for the brass rod to comfortably fit through it.

Then cut as shown. For this i wish i had a Dremel with the cutting blade. But it didn't take long with a hacksaw. I placed the nut in a vice vertically and cut 1 off the 6 sides off.


Make hole where the black dot is and then place the template on the board and using a marker mark dot. Make sure template is aligned. For the other board turn the template around.


Draw lines away from the dot you marked earlier at 90 degrees. I used an ell. Then align the nut's straight side to the left. The dot must be visible through the nuts hole. Remember to mirror the nuts on the other board. I used crazy glue to hold the nuts in place.


The project is now taking shape. Again using crazy glue. Need to hold parts in place with some pressure for about 15 seconds or so. Then leave overnight to dry completely.


I got some styrofoam and stuffed it into the hole of each spool. Then cut of the excess and used a screw to make a hole somewhat in the center of it. The screw was short, (man i hate short screws) :) so i drove the screw on the other side. This is so that the brass rod can be inserted in with ease and does not expand the hole. Man this is beginning to sound vulgar. Cut brass rod to size measuring each of the 3 spool position individually. It may look same but may be off by 1 or 2 mm depending on your board.


The completed product on the right. Can be used as shown on the left. But i had other ideas. You can make it shorter with less spacing between spools. My spacing is based on the biggest spool size and my stubby fingers. So i have enough space to remove the spool should i need to.


This is how i decided to use it. Was thinking of removing the soldering iron holder and mounting it to the side of the box but decided against it. Fire dept. did not approve that idea. :)


73's happy homebrewing, 9w2gu going QRT.


Friday, April 11, 2008

Hook Line and Sinkers

Making you own sinkers. Sometimes strong under sea currents move your sinker around and give you the impression that you have a bite. Well I have made my own sinkers using lead from car’s dead lead acid battery. Though my design is simple, you could make better ones. My idea is that the sinker should lie flat. It never moves even with strong currents. But the drag on retrieve can be a bit high. Below are the sample of some of the sinkers made by me and my friends.


First you need to get and clean (as much as possible) the lead plates from the battery.

Then in a TIN can melt it. Should be done in open area. Lead vapors are poisonous.

Steel band used as a mould. Then the basic shape is formed.

Place the mould on a piece of wood. Open area aligned to the top.

Do the same for the other side and secure it firmly with some string. Then pour molten lead into the opening. To make a hole for the line, I use the bone from a palm tree leaf, dip in coconut oil and quickly drive it thru the molten lead before it hardens. It hardens in about 2 or 3 seconds. Leave to cool down naturally.

Sample of my homemade sinkers.

This one made by my friend using aluminum as a mould. Much soother surface.


Gallery.


I love this quote:-


A bad day of fishing is better than your best day at work.


Tight lines.